One century ago this week, in its March 9, 1918 edition, “Exhibitors Herald” noted in passing a new process for shooting motion pictures in color:
The process developed by Leon F. Douglass was by no means the first attempt at screening color movies. The impulse to add color to black and white monochrome film asserted itself even before experimentation began on actual color photography. In the earliest days, some black and white prints were laboriously hand colored, one frame at a time. Just imagine how labor intensive and time consuming it must have been to color in portions of a 35mm frame that was just under an inch wide and just under 3/4″ high — somewhere between 16 and 20 of them for every second of screen time. Clearly this would not work for longer films, nor was it reproducible. Every single print had to be colored individually by hand. The larger solution for the coloring of films would have to be found elsewhere.
Here’s why the problem was a difficult one. In order to reproduce natural color, you need to be able to mix three primary colors in a range of combinations.
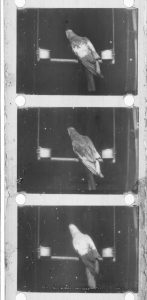
If you’re mixing light, the primaries are red, green, and blue. In order to capture color information on film, then, it’s necessary to separate out the primary color components of the scene and record them separately. The 1899 Lee-Turner system, invented by Edward R. Turner, made a heroic effort to combine all this onto one strip of film, using a rotating color wheel to filter out all but one primary color on successive frames of the film as it ran through the camera. These were black and white images, but one contained the imprint of just the red information, another just the blue information, and another just the green information, in a repeating pattern. It looked something like this:
These are called “separations.” The problem, then, is how to add the primary colors back in and then recombine them on a screen. This required a projector that could project three images at a time, through three separate lenses, each one tinted with a red, green, or blue colored gel. Like so:
Did it work? More or less. The main problem was keeping the registration of the three images together. They had to converge on top of each other perfectly to create the proper visual impression of full color. It worked adequately, but no more than that.
See for yourself. Here’s a video restoration of some of this early color footage. At the end of it you will see the parrot shown in the separations above:
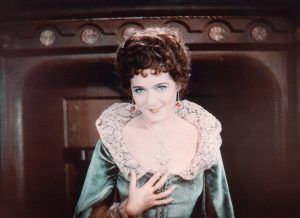
The 1918 Douglass system that “Exhibitors Herald” described attacked the problem somewhat differently. First, instead of encoding all three primary colors, Douglass settled for just two — red and green. You can’t reproduce the entire color spectrum mixing two primaries, but you can reproduce a lot of it. Most especially, you can get flesh tones that look reasonably natural. If there’s a blue chair in the scene that doesn’t get reproduced correctly, how would audiences know? But if flesh tones are wrong it’s immediately apparent. This “two tone” process looks natural enough to get by, and it does simplify the process significantly. Here’s a sample of how it looked:
Secondly, Douglass replaced the spinning color wheel with an optical process inside the camera. A prism behind the lens split the light into two beams, which were then filtered to pass only the red light to one frame and only the green light to the adjoining frame. The camera pulled down two frames at a time, exposing them simultaneously. This was an improvement over the Lee-Turner system, which exposed the frames one at a time, thereby introducing an unavoidable degree of blurring. A print was then made in which, for each (doubled) exposure, each of the two simultaneously shot separation images were imprinted on the same frame by means of a layered emulsion. Then the black and white images with the red and green information were chemically altered to add the appropriate primary colors, a process called “toning.” This meant that instead of monochrome images passing through colored gels or tinted lenses on their way to the screen, there were now colors right there in the frames of the film. With the two sets of colored separations now both toned and superimposed on each other in layers, the projector beam would pass through both without the need for additional Rube Goldberg devices to introduce color externally.
This solved registration and synchronization problems and removed the necessity for a special proprietary projection system, but it also necessitated a different approach to encoding the color information. When you send monochrome images through colored gels as they are projected, you are adding colors. But when you stack up colors on the film itself and pass the white light from the projector lamp through them, those colors are no longer acting as gels. They are, instead, acting as filters — removing colors from the white light, not adding colors. Combine all three primaries this way and you’d get black, not white.
This is called subtractive color mixing. Take another look at that color wheel:
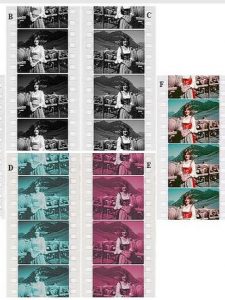
In subtractive mixing, to yield red you need its direct opposite, which is cyan; to yield green, magenta; and to yield blue, yellow. So the colored separations end up looking like this:
The top half of the left two strips show the cyan and magenta (and hence, red and green) information before toning, and the bottom half after toning. The strip on the right shows the combination.
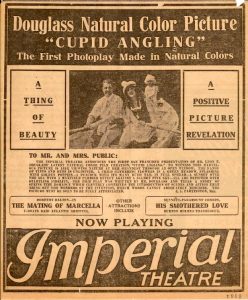
This was actually the second color process developed by Douglass. His previous attempt had involved the older color wheel process, which was cumbersome and unreliable. This newer process, as the “Exhibitors Herald” article notes, had the advantage of requiring no special projection equipment, making it a much more attractive prospect for general adoption in the industry. Indeed, one feature film was shot and released using this process, CUPID ANGLING (1918), which was billed as “a story of spring time romance”:
The Douglass process did not, however, catch on more broadly. It was the Technicolor company, with a two-toned multilayer subtractive process that was actually very similar to the Douglass process, that would enjoy the greatest success in marketing color film stock. Instead of Douglass’s layered emulsion, Technicolor made two separate toned film strips with the primary color information and bonded them back to back. (This meant that one of them had to be printed with the image reversed like a mirror image so that when you flipped the film over it would match.) Their process was used extensively in Hollywood productions during the 1920s, the height of the silent film era. Because of the added expense it was mostly used for isolated scenes rather than entire films, but Douglas Fairbanks did shoot an entire feature length picture, THE BLACK PIRATE (1926), in two-toned Technicolor.
Despite its success in the marketplace, this early Technicolor process was by no means a perfect solution. It was still limited to just two primary colors, so it couldn’t reproduce the entire spectrum, and because of the back-to-back bonding, the prints had an emulsion on both sides, unlike normal film which had an emulsion on one side and a celluloid base on the other side. This made the prints difficult to focus well. Normally you focus on the emulsion, but with a two-tone Technicolor print you could focus on one emulsion or the other, but not both simultaneously.
Technicolor continued to refine the process, and by the mid-1930s they came up with a new and improved method that captured all three primary colors in a subtractive process that still required no special projection. The camera, however, was another story. In order to capture high quality separations for each primary color, they designed a special camera that shot three separate strips of film simultaneously, using a three-way prism beam splitter and filters so that each strip of film was exposed by only one of the primaries.
But it was the way the prints were made that was the real innovation. Instead of being toned, the separations were printed onto a specially designed matrix film stock that could be infused with colored dyes (magenta, cyan, and yellow — remember, this is subtractive). Those dyes could then be transferred onto the finished print from the matrices. The result was that each frame of the finished release print would be, in effect, a tiny lithograph.
The effect was visually stunning. These dye-transfer prints vividly reproduced the entire color spectrum. If you ever have an opportunity to see a 35mm celluloid dye-transfer print projected (you’ll have to go to a museum or archive, like the Museum of Modern Art or the Library of Congress) don’t miss it. It’s a feast for the eyes. These prints are also sometimes called “imbibition” prints (because the print imbibes the dyes) or just “IB-Tech” prints for short. And because the dyes are highly resistant to fading, a dye-transfer print from decades ago will still look just as vibrant as the first time it was projected.
This three-tone Technicolor process was the dominant color motion picture process for a couple of decades. Still, it was used sparingly, mostly for big budget productions, because the proprietary camera equipment was costly, and because these films were difficult to light well. Because a prism system was splitting the light three ways you needed much more baselight on a set to get a proper image exposure. Moreover, because the equipment was licensed under strict controls, you had to hire a “Technicolor consultant” along with leasing the camera, and the consultant was naturally more concerned with producing pretty pictures that would enhance the brand’s image than with capturing evocative images that would better tell the story of the film. This led to a certain amount of friction that sometimes prompted producers to just settle for black and white.
Then, in the early 1950s, Eastman Kodak introduced its Eastmancolor film stock. The Eastmancolor stock bundled everything into a single strip of film. The film was manufactured in layers, with separate layers devoted to capturing specific primary colors and the necessary filters embedded in between. A complex system, to be sure, but it worked. And, best of all, it could be used in any standard camera. No more expensive proprietary camera rental and no more Technicolor consultant telling you how to shoot your movie. Suddenly shooting in color was more practical and more affordable than ever.
Happy ending, right? For everyone except Technicolor, I mean.
Well, not entirely. What no one knew — what no one could have known until years later — is that Eastmancolor fades over time. Badly. As a result, a film that had originally been a faithful representation of the entire color spectrum could end up looking like this:
Ironically, the process that initially looked like the ultimate answer to the expense and difficulty of shooting in color ended up as a cinema landscape littered with degraded prints that looked like a toned separation from the 1920s that was missing its complementary separation. It has fallen to contemporary film restoration technicians, armed with recently developed digital technology, to rescue these Eastmancolor prints so that we can see the films in full color again.
FOR FURTHER STUDY: The summary above is, of necessity, grossly oversimplified. If you’re really interested in the development of color motion picture technology and want all the historical and technical details, I recommend the following web sites:
This page, courtesy of the American Widescreen Museum, is more detailed and very informative. But if you really want a deep dive, I highly recommend this site, the Timeline of Historical Film Colors, an exhaustive and well-researched guide developed and curated by Barbara Flueckiger since 2012.


